Pages

Friday 30 December 2016

DIY Luffy (female version) Shirt Cosplay - Handsew

I am happy to share with you guys on one of my cosplay project where I succeeded to do my own Luffy (from One Piece) shirt! It was not a neat sewing as I actually do not have any basic sewing knowledge or whatsoever. I just learnt how to make it via Youtube and Google only T.T Your constructive advise is welcome to improve my sewing XD 


This is the costume I'm making (the shirt only, as I'm cosplaying Luffy female version)


I'm making the back and front side for the shirt. I used my own cloth (that fits me well) and traced it onto the paper before transferring the pattern to the red fabric.


This is the front side.


This is the back side.


Umm..I do not know what to call this side...it is the middle pattern. where I'm putting on the fake yellow button (it takes time to make the 'real' button pattern side, so as I'm doing this a week before the cosplay event this is the only way haha XD)


After sewing the both (front/back) side and applying the fake button, this is the result. Sorry I don't have details pictures as I was rushing to make this T.T


Oh...I also made the Straw hat and One Piece flag XD Sorry, details pictures are not available T.T


Oh yes. I was there XD


My cosplay - Luffy Female version 1


My cosplay - Luffy Female version 2

 Thanks for reading.


Thursday 29 December 2016

DIY Erza Scarlet Heart Kreuz Armor - Sword

Doing things that you love is really fun! It's my first time doing armor cosplay and I'm happy that it turns out well! Honestly, I really don't have any basic sewing or crafting but thanks to Mr. Google, I manage to do it (somehow). I've been so long dreaming of doing my own armor for cosplay but only now I have the courage to do it. 

I'll be happy to share with you on how I make my Erza Scarlet's armor. I hope it can be a little help to you.

P.s. Do ask me further should you need more information.


Me cosplaying as Erza Scarlet from Fairy Tail 


Erza Scarlet (Fairy Tail) - The character am cosplaying as.

  • SWORD
To make the sword, get two pieces of hard white cardboard. Then, draw on top of the cardboard of the sword design. You will need to pieces of the same sword pattern as we will attached those two together to create the dimensional looks.


Draw the design on top of the cardboard.


Cut the design. You will have two pieces.

Fold it, to create the dimensional looks.


This is top design of the sword. Do a few same pieces of this design as we're going to layer the pieces together to make it thicker.


In my case, I did four-pieces.


This is how the layered pieces looks like.


All pieces glued together.


Ready to be sprayed.

The finished sword! XD

One advise: It will be better if you know how to proportion the size of the sword to your height.

Other tutorials:

Thanks for reading.

DIY Erza Scarlet Heart Kreuz Armor - Belt

Doing things that you love is really fun! It's my first time doing armor cosplay and I'm happy that it turns out well! Honestly, I really don't have any basic sewing or crafting but thanks to Mr. Google, I manage to do it (somehow). I've been so long dreaming of doing my own armor for cosplay but only now I have the courage to do it. 

I'll be happy to share with you on how I make my Erza Scarlet's armor. I hope it can be a little help to you.

P.s. Do ask me further should you need more information.


Me cosplaying as Erza Scarlet from Fairy Tail 


Erza Scarlet (Fairy Tail) - The character am cosplaying as.

  • BELT

Make the pattern before transferring it onto the foam. Ready your belt as we're gonna attached the pieces to the belt once finished all the process. 


The pieces needed to make the belt.


Spray paint and detailing by using the black pen marker.

Spray painting and detailing.

Glue the pieces together and now it's done! XD

Actually, there's an error on the belt part.

One advise: Make sure that the belt is adjusted perfectly to your waist.

Mine is not, as I did not do the measurement on my waist resulting the belt keep falling off to my hips T.T. I blame my inexperience hahaha....

Other tutorials:

Thanks for reading.

DIY Erza Scarlet Heart Kreuz Armor - Gauntlets (Arm) and Elbow

Doing things that you love is really fun! It's my first time doing armor cosplay and I'm happy that it turns out well! Honestly, I really don't have any basic sewing or crafting but thanks to Mr. Google, I manage to do it (somehow). I've been so long dreaming of doing my own armor for cosplay but only now I have the courage to do it. 

I'll be happy to share with you on how I make my Erza Scarlet's armor. I hope it can be a little help to you.

P.s. Do ask me further should you need more information.


Me cosplaying as Erza Scarlet from Fairy Tail 


Erza Scarlet (Fairy Tail) - The character am cosplaying as.

  • GAUNTLETS (Arm)

The gauntlets part is a bit easier. You just need a little patient to make and attach the pieces together. Firstly, find a gauntlet design and stick to it. Do measurement on your fingers and glued the pieces together onto the black long gloves.


These are the complete design for both left and right arms. Glue altogether once all pieces are ready.


Wear the glove and carefully attach the pieces, one by one. Make sure that the pieces adjusted nicely to suit you comforts. 


This is how it looks like.


Spray paint the gauntlets.


Do not forget to black mark the details of the gauntlet after you finish the spaying process. It now finished! XD

  • ELBOW

To do the elbow parts, make a sample of the pattern first and transferred it onto the foam. You will have to iron it so that the foam will be much easier to mould. 


The elbow pieces. Glue the pieces together.


You will have two pieces of elbow parts. This is the sample of a complete pieces. And of course, used black marker to do the detailing parts. 

Thanks for reading.


DIY Erza Scarlet Heart Kreuz Armor - Chest Plate, Collar, Pauldrons (Shoulder)

Doing things that you love is really fun! It's my first time doing armor cosplay and I'm happy that it turns out well! Honestly, I really don't have any basic sewing or crafting but thanks to Mr. Google, I manage to do it (somehow). I've been so long dreaming of doing my own armor for cosplay but only now I have the courage to do it. 

I'll be happy to share with you on how I make my Erza Scarlet's armor. I hope it can be a little help to you.

P.s. Do ask me further should you need more information.


Me cosplaying as Erza Scarlet from Fairy Tail 


Erza Scarlet (Fairy Tail) - The character am cosplaying as.


  • CHEST PLATE MAKING

A lot tutorial you can find on the web i.e. Youtube on how to make the chest plate pattern. You just have to diligently searching out for the one that suits your cosplay. After you have decided on the pattern, do the measurement on your shoulder and body length, chest and neck opening. As mentioned earlier, I don't have any basic sewing so I just made an approximation measurement by using my own cloths that fits me well and trace it on top of the brown paper before transferring onto the foam.

So, assuming now you have your own body pattern, cut and divide it by parts. I have divided few parts of my body pattern that will be shown step by step as per below pictures:

This is my front chest side (from shoulder to chest part). The opening below the chest (as seen above) is to create the "boob-effect". I'm sorry I do not know the correct term. 

The transferred pattern.  Label your pattern to avoid confusing in gluing process. 

Front chest plate. Now you have both left and right side. 

Gluing process. The 'boob' opening is glued and this is how it looks like.

Glued both side and now you have this!


This is the below part of the chest plate. that to be attached to the chest plate. Just use it as it is, you can make adjustment later XD


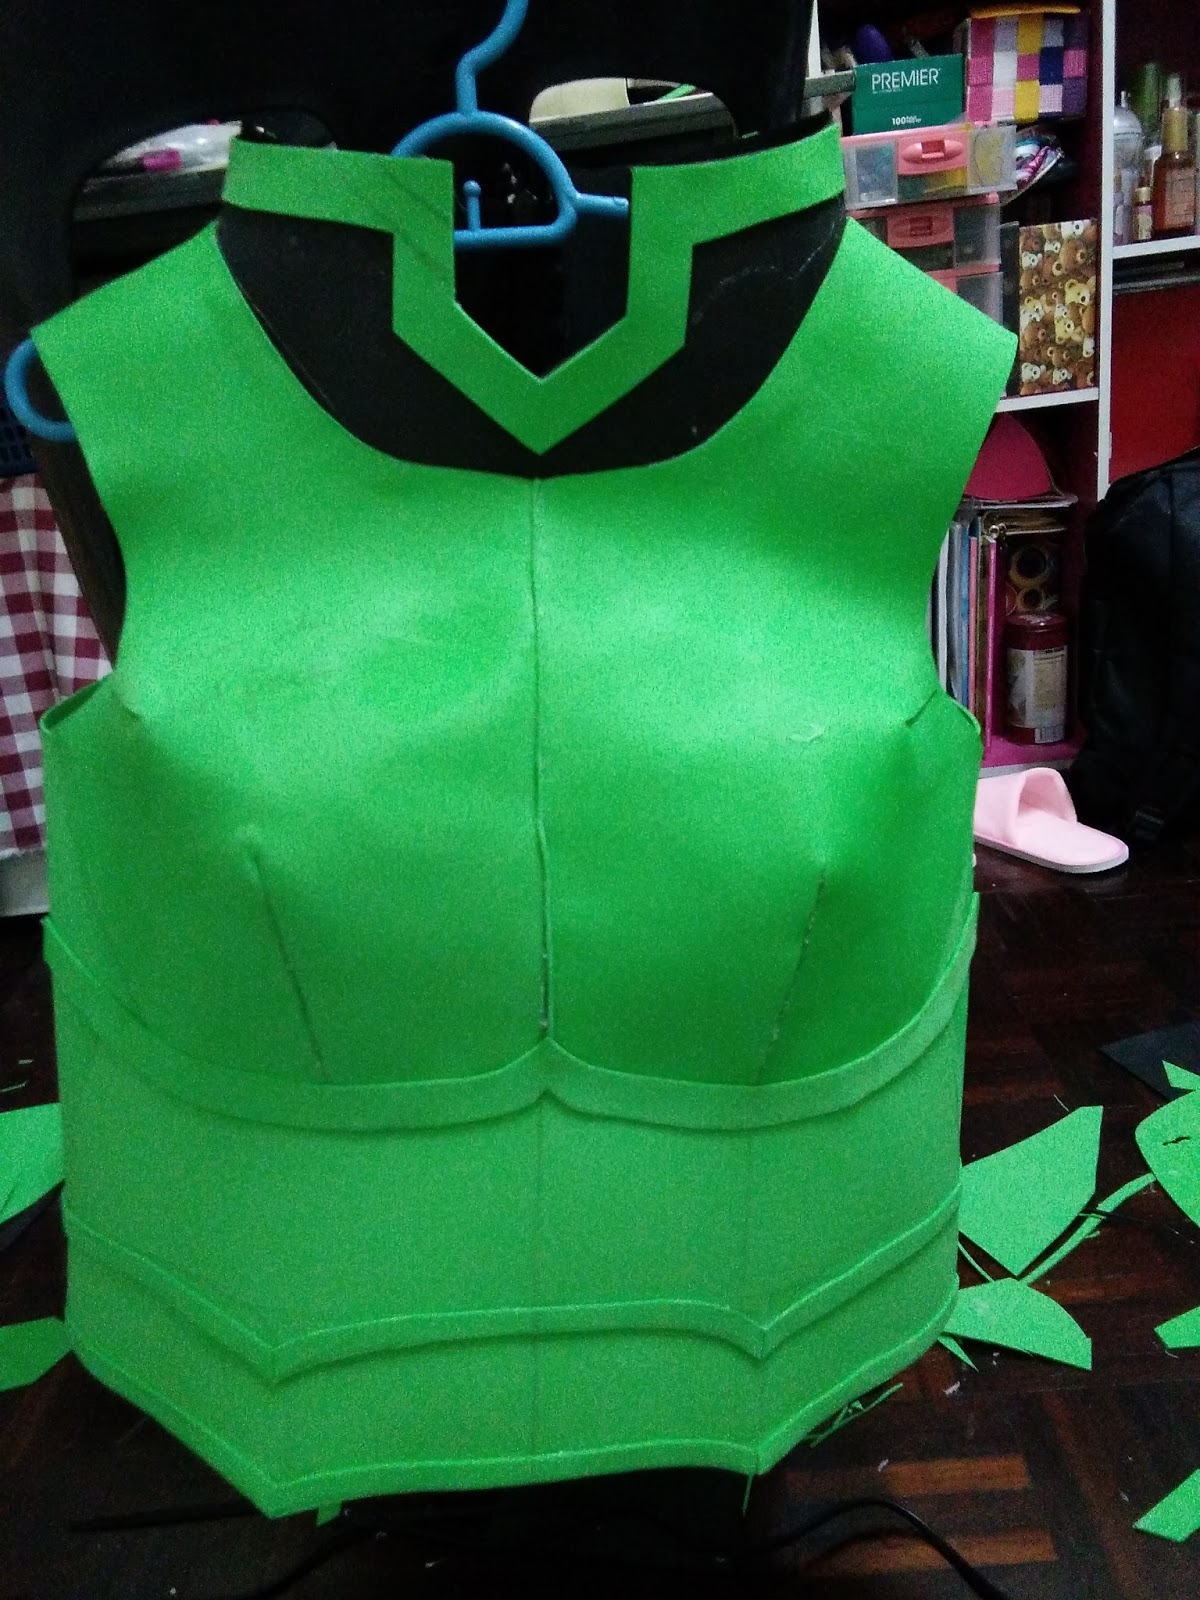
Glued (carefully) the parts. Now, you have complete front side of the chest plate. Do not worry about the extra side foam. It served as seam allowance when you gluing the front and back pattern later. 


Move on to the back side of the chest plate pattern. I'm sorry I don't have the details picture T.T but the making process is the same with the front side. Use the same shirt and trace the back pattern on top of the brown paper and transfer it onto the foam. Get a zip (approx. 50 cm length) to be used for gluing both side of the back pattern. Make sure to have extra length of zip at the top for the collar.


Glued the zip onto the foam. I do not sew the zip to the foam as EVA foam has thin and soft texture. It will easily be ruined if you sew it.

Now that you have both front and back side pattern, just glue both part. Do make sure that it fits you well. You need to wear the chest plate design on your body first to adjust your measurement. Do some mark before gluing the pieces together. It looks messy, I know XD 

The back side. 
Now, the detailing parts. Make sure that you have the characters' costume design in front of you while making the details. You wouldn't want to make some errors.

Finish detailing!

  • COLLAR MAKING

You will need to get two pieces of rectangular foam shape in order to make the collar part. One for the front side, and the other for the back side. Do self-adjustment on the length and wide of the collar.


This is how it should looks like. 


The back side.


Adjust the length and width of the collar. And now lets move on to the detailing parts.


Collar detailing.


Here's the finished collar part.

  • PAULDRONS (Shoulder)

I made a few mistakes on the pauldrons part. It really hard for me to mould the pieces and  I almost gave up T.T but thank goodness, I managed to attached it together XD  

What you do is that take the measurement of  you shoulder, and attach the pieces together. Here's where your creativity will shine. You're gonna need a few pieces to create the dimensional looks. 


The pauldrons. Before (right) and After (left) the pieces is moulded.


Tada! The attached pieces! :D


This is how the back side looks like. Do not worry about the different foam color as we're gonna spray paint it later XD

Move on to painting process! 


One advise: Any foam color is OK but it would be good to have a white-based foam color as it has better absorption quality during the painting process and you don't have to spend more on the spray paint (like I did -.-). 

Find an open space for the painting process. Beware of the strong spray odor. Do not spray inside your room. 

After spraying, now we can add more details to the chest plate. I used black pen marker to make it looks more cartoon-ish.


 I used acrylic color to do the Fairy Tail emblem. Now, you're done! XD 

Other tutorials:


Thanks for reading.


Popular Posts